Wednesday, December 19, 2012

Fondant Frames for Cameos - Tutorial

This is the final post for how I did my fondant cameos. It has to do with finishing the cameo pieces with a type of frame for a nicer edge. For the frames I try to look at my molds a little differently. I look to see how the molded fondant piece can be cut apart to use for a frame. Sometimes I use a lot of little pieces, and other times just a few.


For this frame I'll be using a snowflake mold from First Impressions Molds. As with the other molded fondant posts I'm pushing a ball of fondant into the cavity and pressing out any air with my finger wrapped in a plastic baggie. 
Again this helps to keep the fondant from sticking to my finger and pulling back out of the mold.


 Cleaning up the edges as I go with my plastic wrapped finger I push and squish the fondant to one end of the snowflake adding fondant if needed. I remove the excess and clean up the last edge using my fingernail (still in plastic) or the blunt end of a toothpick.


After the excess fondant is removed it should look like this with clean edges and the fondant should be flat with the top of the mold. Place this in the freezer for about 10 minutes.


After about 10 minutes pop the snowflake out of the mold right side up onto parchment paper.
Note: The fondant will start to soften up right after leaving the mold so leave it undisturbed until it dries.
If condensation appears on the mold let it air dry before using again, or if you need the mold again right away dry it with a coffee filter as these won't leave lint on the mold.
For my cameo frame I will need two fondant snowflakes, so I will mold another one as soon as I dry my mold. 


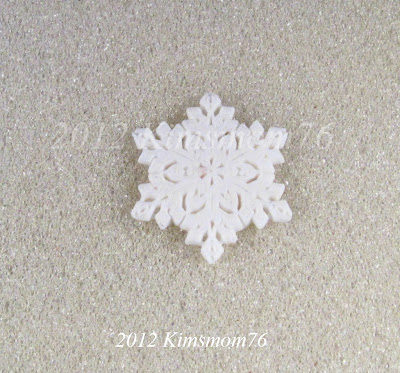
This is one whole snowflake. I'll need two snowflakes to finish a frame that will fit around the cameo.


 To make the frame pieces fit around my cameo I cut each snowflake in half.


Now I need to fit the cut halves around the section of cameo where the frame piece will go, so I need to use the part of the oval cutter (same cutter I used to cut the cameo background) to match where it will set around the cameo.
This piece will go on the side of the cameo as I'm using the side of the cutter.


Hopefully this photo will help clarify what I mean.
 I used the top and bottom of the cutter to cut the section where the top and bottom snowflake frame piece will go so it will fit around that part of the cameo. I then did the same with the sides.


Now all the frame pieces fit snug against the cameo. The cameo can now be adhered with a dab of royal icing to an iced cookie followed by the individual framing pieces. Any gaps will be filled in with sugar pearls or royal icing dots.


Here are two photos of Christmas ornaments cookies using snowflake frames that I did last year for a magazine tutorial. The photo on the left shows an iced cookie with just the fondant pieces attached. The photo on the right shows a finished cookie with fondant pieces, jewelry transfers, individually place sugar pearls and dragees, as well as simple royal icing accents piped on to fill in some empty spaces.


Happy Decorating


Monday, December 17, 2012

Danielle's Christmas Bells

Today's post will be a little different. It's a little story about Danielle and her Christmas Bells and how ringing them helped her cope with the loss of her other Grandmother, Arianna who passed away shortly before Christmas last year.

These are Danielle's Christmas Bells


A year ago I was babysitting my 4 year old grand-daughter Danielle when she noticed the cascading bells I had recently purchased and hung up for Christmas. Standing on tip toes she could barely reach the lower bell to ring it.
As she was trying to ring it again, I told her the old adage that every time a bell rings an angel gets it's wings.
After telling her this she promptly pushed a chair up to the bells, climbed onto it and starting ringing them like crazy. When I asked her why, she told me she was giving her other grandmother Arianna her wings. I had tears streaming down my face as I hugged that sweet girl.
When it came time to put the holiday decorations away I had a tough time emotionally taking down those bells, but reluctantly did. Needless to say Danielle was very put out when she noticed they were gone, as she rang those bells whenever she came over. Well as fate or luck would have it I found and bought bells with hearts during February for Valentine's day and hung them up for Danielle to ring.
Since then I've bought decorative bells in all styles that cover all the holidays so Danielle will always have her bells to ring and give out angel wings.

We will be ringing Danielle's bells for all those sweet angels in Connecticut that were sent to heaven too soon.
Our prayers are with those families that lost loved ones as well as the community that will forever be changed.


♥ Hugs and Prayers ♥


Sunday, December 9, 2012

Fondant Floral Cameos - Tutorial

I have been asked numerous times how I did the cameos for my Christmas ornament cookies. I thought I'd take the time and re-do the cameo part of the photo tutorial I did for the German magazine Magie Des Zuckers.


I start with a flexible mold and two colors of fondant. This is a floral cameo mold set from First Impressions Molds. I love their molds because of the depth of detail, and extreme flexibility.
At this point I will also tell you to practice and get to know your mold especially if you're doing a two toned layered design so you'll know when and where you need to add or remove fondant to achieve a sharp clean cameo image.
I start by placing a ball of the first color of fondant (in this case white) in the center of the mold cavity. I can add more fondant as I need it.


I've placed my finger in a tip of a plastic baggie so the fondant doesn't stick to it and pull back out of the mold. I'm pressing the fondant into all the crevasses that create just the flower part of the design.


I push it to the very ends of the floral design scraping back with my fingernail (still in plastic) so I leave just the flower. Notice how clean the flower design is in the first cavity. The second cavity shows some darkened areas (see arrows) that I know is part of the background and should be scraped back, but I'm leaving them to show how it will affect the cameo look later.


In some cases using the blunt end of a toothpick, or skewer will help in removing the excess fondant. Just don't use anything too sharp as you might damage the mold. If you happen to remove too much, just add it back and try again. This may seem time consuming, but the more you get to know your mold, the faster you'll get.


Now that all the cavities are finished, its on to the second part of the cameo.....the background.
To make the background piece I use an oval cutter that is pretty close to being the right size to fit the oval section of my mold. This cutter came as part of a set of three and I think it was in the clay section of my craft store.


I roll out my second color of fondant with a Wilton fondant roller and cut an oval out with the cutter. I'm using a darker brown than I normally do so the details will show up better.


I lay this into a flower cavity and carefully press it into place. I doesn't take much pressure. Just a couple of circular motions should do it. You want to adhere the floral section with the background piece. Be careful because the fondant flower underneath is still pliable, and you don't want to cause it to become distorted.


When all the cavities are finished, pop this into the freezer for about 10-15 minutes.


After 10 or 15 minutes in the freezer they should be hard enough to pop out when the mold is flexed.
Carefully pop them out helping with your fingers if needed and place them right side up on parchment paper to dry. I actually use some foam pieces I've saved that were used as cushioning between commercially piped royal icing figures. They don't stick, and air can circulate easier to dry them faster.


 And here they are. They will almost immediately start to soften up again once they're out of the freezer, so leave them undisturbed until they're dry.
Notice the second finished cameo. That was the one I didn't completely scrape away all the excess white fondant and you can see the difference it makes in the overall look. The end one on the right also looks like I should have spent more time removing the background.
When these are dry enough to pick up without distorting the design they can be placed onto iced cookies, or if you're making them ahead, keep them in a container until you're ready to use them.
If you need to use the mold again right away dry off any condensation with a coffee filter as they won't leave lint.
Next time I'll show fondant framing for the cameos. 

Happy Decorating


Tuesday, December 4, 2012

Molded Fondant Accent Pieces - Tutorial

Today I'm making molded fondant pieces that I make a little ahead of time and store for later use on my Christmas cookies. This is how I also made all the accent pieces for my Cameo Christmas Ornament cookies. (seen here) I'll show the floral cameos in a later post.
First of all I'll tell you I use Fond-X brand rolled fondant. I usually just buy it in white because I don't use that much, and it's easy to color if I need to. It sort of tastes like marshmallow. I've tried other easier to find brands, but let's just say they're edible (according to the packaging) just not palatable. They do make great practice fondant though.  I also just bought a chocolate rolled fondant recently because I needed to make black and thought this way it wouldn't need too much coloring.  Sweet Inspirations makes it, and it tastes like Tootsie Rolls. They also make a white chocolate fondant as well as colors which I haven't tried yet.


These are some of the many molds I have bought, and made over the years. My favorites are the bright blue ones made by First Impression Mold Company. Most of the other ones I've made using jewelry bits, buttons, etc.

I'm just going to show you how I mold bows today, but I'm guessing this technique can probably be used for any flat mold.
This is a mold from First Impression that I use quite frequently. I love all the different size bows, and the fact that there are multiples of them in this single mold.
Anyway I start by placing a small piece of fondant into the cavity using my plastic baggie wrapped finger. The plastic helps to keep the fondant from sticking to my finger and pulling back out of the mold.
Note: This is how I do fondant.  I'm sure there is a "correct" perhaps more professional way that you're supposed to mold fondant, or prepare the molds, but this is how I do mine, and it seems to work for me.

I push until I'm pretty sure there are no air pockets under the fondant and it's flush with the top, adding or removing fondant with my plastic wrapped fingernail as I go. You'll notice some excess fondant has squished out and is covering the area in between the tails of the bow. We need to take care of that...
I scrape any excess fondant with my fingernail (still in plastic). But the blunt end of a toothpick or skewer can also be used if it works better for you. I just wouldn't use anything sharp as it might damage the mold.
 Once all the cavities you need are filled, put the mold into the freezer for about 10 minutes.
Note: I know that some like to de-mold the fondant piece right away to reuse the mold especially if you need to make a lot of fondant pieces of one design, but I find I get more distorted pieces this way (perhaps I'm just klutzy). I'm willing to go the freezer route, even if it means extra time. I usually have several other different pieces to mold and can do these while the others are in the freezer.
When time is up the pieces should be hard enough to pop away from the mold. You may need to help them out with your fingers. Carefully place them right side up on some parchment paper and leave them to dry. If you need to use the pieces right away make sure they are dry enough to handle without losing their shape or details.
Note 1: As soon as the molded pieces leave the freezer they will start to soften up again, so they need to be left undisturbed until they are dry enough to handle. Time will vary I'm sure with humidity, star alignment and whatever else seems to affect my cookie preparation for the day.
Note 2: The mold might have a slight build-up of condensation on it because of the freezer, so let it dry before using it again. Or if you need it again right away dry it with a coffee filter as these won't leave lint particles on the mold.
Aren't they cute?
If you want, add any detail marks or indentations for sugar pearls after they have dried long enough not to lose their shape, but are still pliable enough not to break. When the fondant shapes are dry enough to pick up without ruining the shape you can use them on your cookies.
 I will usually let mine dry completely and store them in a container for a few days until I need them. I'm really not an expert on this, but through trial and error I've found what works for me. I know you're tired of hearing this, but practice and do what works for you.
 Next time I'll show how I make two colored cameos.

Happy Decorating