Wednesday, December 19, 2012

Fondant Frames for Cameos - Tutorial

This is the final post for how I did my fondant cameos. It has to do with finishing the cameo pieces with a type of frame for a nicer edge. For the frames I try to look at my molds a little differently. I look to see how the molded fondant piece can be cut apart to use for a frame. Sometimes I use a lot of little pieces, and other times just a few.


For this frame I'll be using a snowflake mold from First Impressions Molds. As with the other molded fondant posts I'm pushing a ball of fondant into the cavity and pressing out any air with my finger wrapped in a plastic baggie. 
Again this helps to keep the fondant from sticking to my finger and pulling back out of the mold.


 Cleaning up the edges as I go with my plastic wrapped finger I push and squish the fondant to one end of the snowflake adding fondant if needed. I remove the excess and clean up the last edge using my fingernail (still in plastic) or the blunt end of a toothpick.


After the excess fondant is removed it should look like this with clean edges and the fondant should be flat with the top of the mold. Place this in the freezer for about 10 minutes.


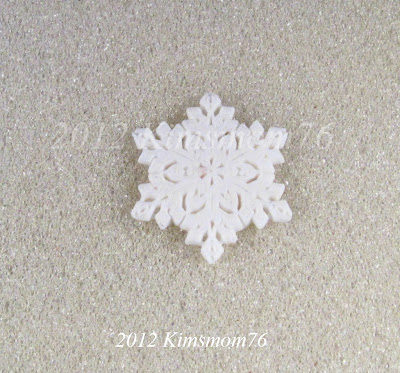
After about 10 minutes pop the snowflake out of the mold right side up onto parchment paper.
Note: The fondant will start to soften up right after leaving the mold so leave it undisturbed until it dries.
If condensation appears on the mold let it air dry before using again, or if you need the mold again right away dry it with a coffee filter as these won't leave lint on the mold.
For my cameo frame I will need two fondant snowflakes, so I will mold another one as soon as I dry my mold. 


This is one whole snowflake. I'll need two snowflakes to finish a frame that will fit around the cameo.


 To make the frame pieces fit around my cameo I cut each snowflake in half.


Now I need to fit the cut halves around the section of cameo where the frame piece will go, so I need to use the part of the oval cutter (same cutter I used to cut the cameo background) to match where it will set around the cameo.
This piece will go on the side of the cameo as I'm using the side of the cutter.


Hopefully this photo will help clarify what I mean.
 I used the top and bottom of the cutter to cut the section where the top and bottom snowflake frame piece will go so it will fit around that part of the cameo. I then did the same with the sides.


Now all the frame pieces fit snug against the cameo. The cameo can now be adhered with a dab of royal icing to an iced cookie followed by the individual framing pieces. Any gaps will be filled in with sugar pearls or royal icing dots.


Here are two photos of Christmas ornaments cookies using snowflake frames that I did last year for a magazine tutorial. The photo on the left shows an iced cookie with just the fondant pieces attached. The photo on the right shows a finished cookie with fondant pieces, jewelry transfers, individually place sugar pearls and dragees, as well as simple royal icing accents piped on to fill in some empty spaces.


Happy Decorating


Monday, December 17, 2012

Danielle's Christmas Bells

Today's post will be a little different. It's a little story about Danielle and her Christmas Bells and how ringing them helped her cope with the loss of her other Grandmother, Arianna who passed away shortly before Christmas last year.

These are Danielle's Christmas Bells


A year ago I was babysitting my 4 year old grand-daughter Danielle when she noticed the cascading bells I had recently purchased and hung up for Christmas. Standing on tip toes she could barely reach the lower bell to ring it.
As she was trying to ring it again, I told her the old adage that every time a bell rings an angel gets it's wings.
After telling her this she promptly pushed a chair up to the bells, climbed onto it and starting ringing them like crazy. When I asked her why, she told me she was giving her other grandmother Arianna her wings. I had tears streaming down my face as I hugged that sweet girl.
When it came time to put the holiday decorations away I had a tough time emotionally taking down those bells, but reluctantly did. Needless to say Danielle was very put out when she noticed they were gone, as she rang those bells whenever she came over. Well as fate or luck would have it I found and bought bells with hearts during February for Valentine's day and hung them up for Danielle to ring.
Since then I've bought decorative bells in all styles that cover all the holidays so Danielle will always have her bells to ring and give out angel wings.

We will be ringing Danielle's bells for all those sweet angels in Connecticut that were sent to heaven too soon.
Our prayers are with those families that lost loved ones as well as the community that will forever be changed.


♥ Hugs and Prayers ♥


Sunday, December 9, 2012

Fondant Floral Cameos - Tutorial

I have been asked numerous times how I did the cameos for my Christmas ornament cookies. I thought I'd take the time and re-do the cameo part of the photo tutorial I did for the German magazine Magie Des Zuckers.


I start with a flexible mold and two colors of fondant. This is a floral cameo mold set from First Impressions Molds. I love their molds because of the depth of detail, and extreme flexibility.
At this point I will also tell you to practice and get to know your mold especially if you're doing a two toned layered design so you'll know when and where you need to add or remove fondant to achieve a sharp clean cameo image.
I start by placing a ball of the first color of fondant (in this case white) in the center of the mold cavity. I can add more fondant as I need it.


I've placed my finger in a tip of a plastic baggie so the fondant doesn't stick to it and pull back out of the mold. I'm pressing the fondant into all the crevasses that create just the flower part of the design.


I push it to the very ends of the floral design scraping back with my fingernail (still in plastic) so I leave just the flower. Notice how clean the flower design is in the first cavity. The second cavity shows some darkened areas (see arrows) that I know is part of the background and should be scraped back, but I'm leaving them to show how it will affect the cameo look later.


In some cases using the blunt end of a toothpick, or skewer will help in removing the excess fondant. Just don't use anything too sharp as you might damage the mold. If you happen to remove too much, just add it back and try again. This may seem time consuming, but the more you get to know your mold, the faster you'll get.


Now that all the cavities are finished, its on to the second part of the cameo.....the background.
To make the background piece I use an oval cutter that is pretty close to being the right size to fit the oval section of my mold. This cutter came as part of a set of three and I think it was in the clay section of my craft store.


I roll out my second color of fondant with a Wilton fondant roller and cut an oval out with the cutter. I'm using a darker brown than I normally do so the details will show up better.


I lay this into a flower cavity and carefully press it into place. I doesn't take much pressure. Just a couple of circular motions should do it. You want to adhere the floral section with the background piece. Be careful because the fondant flower underneath is still pliable, and you don't want to cause it to become distorted.


When all the cavities are finished, pop this into the freezer for about 10-15 minutes.


After 10 or 15 minutes in the freezer they should be hard enough to pop out when the mold is flexed.
Carefully pop them out helping with your fingers if needed and place them right side up on parchment paper to dry. I actually use some foam pieces I've saved that were used as cushioning between commercially piped royal icing figures. They don't stick, and air can circulate easier to dry them faster.


 And here they are. They will almost immediately start to soften up again once they're out of the freezer, so leave them undisturbed until they're dry.
Notice the second finished cameo. That was the one I didn't completely scrape away all the excess white fondant and you can see the difference it makes in the overall look. The end one on the right also looks like I should have spent more time removing the background.
When these are dry enough to pick up without distorting the design they can be placed onto iced cookies, or if you're making them ahead, keep them in a container until you're ready to use them.
If you need to use the mold again right away dry off any condensation with a coffee filter as they won't leave lint.
Next time I'll show fondant framing for the cameos. 

Happy Decorating


Tuesday, December 4, 2012

Molded Fondant Accent Pieces - Tutorial

Today I'm making molded fondant pieces that I make a little ahead of time and store for later use on my Christmas cookies. This is how I also made all the accent pieces for my Cameo Christmas Ornament cookies. (seen here) I'll show the floral cameos in a later post.
First of all I'll tell you I use Fond-X brand rolled fondant. I usually just buy it in white because I don't use that much, and it's easy to color if I need to. It sort of tastes like marshmallow. I've tried other easier to find brands, but let's just say they're edible (according to the packaging) just not palatable. They do make great practice fondant though.  I also just bought a chocolate rolled fondant recently because I needed to make black and thought this way it wouldn't need too much coloring.  Sweet Inspirations makes it, and it tastes like Tootsie Rolls. They also make a white chocolate fondant as well as colors which I haven't tried yet.


These are some of the many molds I have bought, and made over the years. My favorites are the bright blue ones made by First Impression Mold Company. Most of the other ones I've made using jewelry bits, buttons, etc.

I'm just going to show you how I mold bows today, but I'm guessing this technique can probably be used for any flat mold.
This is a mold from First Impression that I use quite frequently. I love all the different size bows, and the fact that there are multiples of them in this single mold.
Anyway I start by placing a small piece of fondant into the cavity using my plastic baggie wrapped finger. The plastic helps to keep the fondant from sticking to my finger and pulling back out of the mold.
Note: This is how I do fondant.  I'm sure there is a "correct" perhaps more professional way that you're supposed to mold fondant, or prepare the molds, but this is how I do mine, and it seems to work for me.

I push until I'm pretty sure there are no air pockets under the fondant and it's flush with the top, adding or removing fondant with my plastic wrapped fingernail as I go. You'll notice some excess fondant has squished out and is covering the area in between the tails of the bow. We need to take care of that...
I scrape any excess fondant with my fingernail (still in plastic). But the blunt end of a toothpick or skewer can also be used if it works better for you. I just wouldn't use anything sharp as it might damage the mold.
 Once all the cavities you need are filled, put the mold into the freezer for about 10 minutes.
Note: I know that some like to de-mold the fondant piece right away to reuse the mold especially if you need to make a lot of fondant pieces of one design, but I find I get more distorted pieces this way (perhaps I'm just klutzy). I'm willing to go the freezer route, even if it means extra time. I usually have several other different pieces to mold and can do these while the others are in the freezer.
When time is up the pieces should be hard enough to pop away from the mold. You may need to help them out with your fingers. Carefully place them right side up on some parchment paper and leave them to dry. If you need to use the pieces right away make sure they are dry enough to handle without losing their shape or details.
Note 1: As soon as the molded pieces leave the freezer they will start to soften up again, so they need to be left undisturbed until they are dry enough to handle. Time will vary I'm sure with humidity, star alignment and whatever else seems to affect my cookie preparation for the day.
Note 2: The mold might have a slight build-up of condensation on it because of the freezer, so let it dry before using it again. Or if you need it again right away dry it with a coffee filter as these won't leave lint particles on the mold.
Aren't they cute?
If you want, add any detail marks or indentations for sugar pearls after they have dried long enough not to lose their shape, but are still pliable enough not to break. When the fondant shapes are dry enough to pick up without ruining the shape you can use them on your cookies.
 I will usually let mine dry completely and store them in a container for a few days until I need them. I'm really not an expert on this, but through trial and error I've found what works for me. I know you're tired of hearing this, but practice and do what works for you.
 Next time I'll show how I make two colored cameos.

Happy Decorating

Monday, November 26, 2012

Cocoa Cone for One - Tutorial

I've done regular cocoa cones for many years adding them to homemade Christmas gifts because they are great fillers, and can add height and bulk when needed. Plus they are easy and fast and fairly inexpensive to make.  For a photo how-to on a regular cocoa cone (click here) and then click on each individual photo for the step by step I made for my eldest daughter.
This year however I wanted to make something different. Something cute and inexpensive to hold just a single serving of cocoa.


Here is what I came up with. I think it's cute, and it's certainly inexpensive. And they can be made year round just by changing the color of icing and sprinkles.
 This is my version of the chocolate dipped ice cream cone that's been around forever. But instead of filling it with ice cream, I filled it with the dry ingredients for making one cup of cocoa.
I forgot to take photos while I was decorating the cones, but basically I just piped around the upper rim of the cone with thick royal icing letting it drip slowly down the outside and added sprinkles. I let these dry overnight.
This can also be done using melted chocolate, but I'm all about finding ways not to throw away leftover cookie icing.
I was going to try and make homemade marshmallows swirled to look like soft serve ice cream as that would make it look even more like an ice cream cone, but I already have enough on my Holiday to-do list without adding more.


For the bottom part of the cocoa cone I used a single serving of cocoa mix, a cheap sandwich baggie (these are more flexible) and a twist tie. 
I drape the baggie over a small glass and carefully pour in the cocoa mix trying not to get too far up the sides. (you don't want cocoa adhering to the plastic above where the twist tie will go).  
Tightly twist the tie around the bag and cut off the excess of the tie as well as the baggie, leaving about an inch.


Shown in the photo above are the ingredients I used to make the top part of the cocoa cone, as well as a sandwich baggie, and a twist tie.
You can substitute about 15-20 mini marshmallows for the marshmallow bits and regular chocolate chips for the mini ones. This is just a general guideline as I'm sure you'll add your own unique touches to these. Depending on the cone size you may have to adjust the ingredient amounts as well.
Note: I suggest doing a practice one to see how it sets in the cone and adjust the ingredients accordingly.
As for the type of marshmallows and size of chocolate chips I'm using I just like the way the bits and minis handled and settled better into the baggie. The marshmallow bits are made by Kraft, and they are much smaller than mini marshmallows. They come in a plastic jar and and they taste and feel like those colored shapes in Lucky Charms cereal, but will soften in the hot cocoa. 


Center a corner point of the baggie over a small glass and drop in a a red candy ball (I used a pretzel m&m),  then add just a pinch of the sprinkles leaving the rest for later. Next add all of the marshmallow bits and very slightly tap the glass to settle everything.

Add the remaining sprinkles over the top of the marshmallow bits tapping the glass to distribute them evenly. Lastly add the mini chocolate chips. Take out the baggie and tightly tie a twist tie to secure, cutting off the excess twist tie and baggie leaving about an inch.

 Take a decorated cone and drop a baggie of cocoa mix into the bottom tucking down the end of the baggie. Add the marshmallow/chocolate chip baggie by placing it into the cone "cherry" side up.
These are now ready to be placed in a cello bag with a ribbon, or another container of your choice. Remember the top baggie is just setting on top, so take that into consideration when bagging these and tie the ribbon close to the top of the cherry to hold it all together.


 Almost ready to go.
I've placed the wrapped cocoa cone into a holiday mug. I adjusted the height by adding tissue paper to the bottom because this mug was so tall, and I wanted the cone to show above the rim. I've also added wrapped chocolate candies, candy canes and a chocolate covered spoon.
This will all be placed in a small gift bag, labeled and then it will be ready to go.
Don't forget to add instructions to your tags.
Something like this: Stir cocoa mix into 3/4 cup of hot water mixing well. Add chocolate chips, marshmallows and sprinkles. Save out the red candy ball to eat while enjoying your hot cocoa.
(Read the directions that are printed on your cocoa mix for the correct amount of water or milk as this might vary from mix to mix).
The cone itself can also be eaten of course. 


♥ Happy Decorating ♥


Sunday, November 18, 2012

Decorated Christmas Sugar Cube- Tutorial

I'm still planning ahead for the Holidays and today I'm making royal icing decorated Christmas sugar cubes. They're easy enough to make ahead, and will add a little something extra to the homemade treats I am planning to give to family members this Christmas.


Some designs are easier for me to make as icing transfers rather than pipe directly onto sugar cubes, like these little bows for example.
I've designed and printed out my bow shapes onto a piece of paper with waxed paper secured over the top of it. 
Using a fairly thick, but not quite piping, consistency royal icing I begin filling in just the top part of my bow design using the print out as a guide. I let these sections set up a bit before piping the next sections.


After the tops of the bows are set so they won't run into the next section, I pipe the lower parts of the bows, and again let these set up just a bit.


 The center is added when the other sections are dry enough not to run together. 


I decided to add tails to these even though I didn't draw them on the original design. I'm doing one at a time and again letting them dry in between so they don't run together and lose definition.


After the last tail is piped, I let these dry completely before adhering each one to a sugar cube with a dab of icing.


Another design I prefer to do as icing transfers are these tiny gingerbread men. These are done without letting the sections dry in between because I want the piped sections to blend together seamlessly.
So I don't bore you by doing each step as a separate photo I show all the piping steps here in one photo. (last 4 gingerbread men in the bottom row)
I start by piping a line across where the arms go following the waxed paper covered printout I made ahead. Then I add the legs one at a time followed by the head. After all the gingerbread men are piped I let them dry completely.
Note: If you find your icing is running together too fast, let each piped section set up a bit before piping the next one. Pipe a row or two of just the arms, and then go back and add just a leg and so on.


Once the gingerbread men were dry I painted on the details with a tiny brush and food coloring. These are adhered one at a time to a sugar cube with a dab of icing when the details are dry.


These candy canes were easy enough to pipe right onto the sugar cubes. Using a thicker but not quite outline consistency icing, (I didn't want peaks) I piped red dots into a cane shape leaving space for the white to be added later.


When the red dots were dry I piped white dots in between.


This last design was also piped directly onto the sugar cube using a small leaf icing tip.
This design takes a bit of practice especially if you've never done this technique before.  Using a slight up and down motion while gently squeezing out the icing is only way I can explain how I do this.  Ending the leaf tip can be tricky, but with practice you'll find what works. You stop squeezing and pull away. Too fast and you might end up with a split leaf point. Too slow and the leaf point may elongate and fall over the side of the cube. Like I said, practice. I do practice runs on waxed paper every time before I pipe leaves until I get the look I want and a rhythm going.
These can be done as icing transfers as well.
 Once the leaves are all piped I let them dry before going on to the next step.


After the leaves dried I piped on three red berries to give them sort of a holly look .


 Here are my finished sugar cubes all snug in these cute little candy boxes. I found these boxes with the inserts at a cake decorating store that fit 16 cubes. That looks to me like the perfect amount for gift giving. I've tried to locate them online, but no luck so far. The box comes with a clear top so all I need to add is a bow and I can cross this item off my long Holiday to do list.


  ♥ Happy Decorating

Monday, November 12, 2012

Royal Icing Jewelry Transfers - Tutorial

I like to make "cookie bling" or jewelry icing transfers throughout the year whenever I have some spare time and leftover icing. With the hectic getting-ready-for-the-holidays hubbub coming up fast it's important for me, sanity wise, to have as much advance preparation done as possible.
They're not very hard to make, but they can be time consuming, which is why I make them as time permits throughout the year.
One more thing, a good pair of off set or angled tweezers make this go so much better.


These little gems are called dragees, and depending on where you live they can be very hard if not impossible to find. I won't go into all the reasons here, but because I live in California I'll refer to them as non edible decorations and hopefully avoid be hauled off in cookie cuffs to culinary jail.
horde have various colors and sizes of these to make jewelry bling for my cookies. And because I make them as a transfer and only adhere them to the cookie with a dab of icing they're easy enough to take off  before actually eating the cookie.


Shown here are some sugar pearls and small mint candies that I use to make my cookie jewels as well. The bottom row is how these happen to look right out of the container. The top row shows how they look after I shake them around in pearl dust. Some brands come already pearlized (I'm going to say that's a word even though spell check is telling me it's not).
The larger candies on the right are Wilton mints used for making wedding favors.


 Wilton multi colored candies are on the bottom left, followed by black then pink sugar pearls.
Again the top row shows them after a shake in pearl dust.
Some brands of sugar pearls or candy don't seem to take too well to the dusting process, so I do a test run first. Also if they're handled too much the pearl dust can rub off on your fingers, so I like to use tweezers when putting together the jewels.


To make this jewel design I start by placing a drop of royal icing on a piece of waxed paper taped over a grid pattern. The grid helps me make sure I have enough room to work, by keeping them spaced apart so I won't run into the previous design and destroy all my hard work.
I set a dragee into the dot of icing letting some squish out a bit. The offset tweezers let me place them easily.


Into the excess icing I'm placing 4 tiny dragees in a square pattern around the center.


Adding more icing I place sugar pearls in between the tiny dragees. (Top of the photo)
The lower jewel in the photo is a finished one that still needs to dry.
Notice that I place just enough icing to adhere the sugar pearl I'm currently placing to the others, but not so much that it spreads out. I think it gives it a more realistic  "jewelry" look.


At the top of this photo is the beginning of another design. It starts out the same way, only this time the tiny dragees will go all the way around the center sugar pearl. You can stop at this point for a small jewel, but I'm going to add another circle of pearls.


Adding more icing as needed I surround the tiny dragees with more sugar pearls. And that finishes up that design.


This next design is one of my favorites. You start the same way as with the two lower left jewels in the photo. The next step is to place a drop of icing above each tiny dragee and add a sugar pearl. I'm adding one in this photo.


 I'm adding the third one here.
Remember to add drops of icing as needed so each bead will adhere to the ones next to it and the whole thing will hold together when dry.


This is the last pearl for this design. These all will need to dry for least 12 - 24 hours or more depending on humidity.


These are just a few of the easier multi use design shapes I use over and over. They can be easily altered by changing the color and the size of the pearls and dragees.
Using black icing instead of white will give the jewels a more dramatic look.
In the past I've added these jewels to molded fondant shapes, as well as placing them as accents for added bling and sparkle to jazz up what could be just a plain cookie.
Note:  The dragees will discolor or tarnish over time if left out in the open, so if you are making these up for future use, keep them in an airtight container once they dry. I actually pipe one design over and over until I have a sheet of them, then leave the finished and dried jewelry on the waxed paper. I place the whole sheet in a plastic "zipper" type baggie and store these stacked between a layer of bubble wrap and place them in an airtight container. When I need them I just peel them off the waxed paper and "glue" them to my cookies with a dab of icing.


Happy Decorating